Relations
Slicknode comes with a flexible system to create relations between the objects that are stored in your application. You can create most of the data models of modern applications with a single line of GraphQL markup. Slicknode automatically takes care of creating the relational tables, applying and enforcing foreign key constraints, generating the query API, filter types etc.
It also supports cascading deletes and updates and enforces the data integrity on the database level for maximum data consistency.
There are several ways to create relationships between different object types.
Stored Relations (One-to-one)
The easiest way to create a relation between two object is by adding a field of that type to the object:
For example:
type NewsFeed_Author implements Node {
  id: ID!
  nickname: String! @unique
}

type NewsFeed_Article implements Node {
  id: ID!

  # This creates a relation to the NewsFeed_Author object
  # Each article has exactly one author
  author: NewsFeed_Author
  text: String!
}
Under the hood Slicknode adds a column of type ID to the database table of the article and adds a foreign key constraint.
Warning
When making a related field a required field (author: NewsFeed_Author!), Slicknode will automatically
delete depending objects. For example if you were to delete an author from the database, all the
articles of that author would be automatically deleted as well. This ensures that there are no
orphaned records in the database and results in a consistent dataset. If you don't want to enable
cascading deletes, just add the field with a nullable type.
Virtual Relations
If you want to create Many-to-many or One-to-many relationships, or if you want to create relations between objects
without changing the underlying data storage in the system, you can use virtual relation fields
and configure the relation via the @relation directive.
The @relation directive is a flexible directive to connect object types. It can connect any
object types in the system without changing the stored data structure. It just adds a field
to the GraphQL object type and performs all the data fetching logic automatically, while
applying permission filters etc.
To create a virtual relation, you have to create a field of the connected type and configure the path along which the objects are connected and can be looked up by the Slicknode query engine. This is easiest to understand with a Many-to-many relation example.
Many-to-many Relation
If you want to create a Many-to-many relation you have to add a virtual relation.
For example, let's assume you want to build a community module that has persons, groups and group memberships. A person can be in many groups and each group can have many members, the classic Many-to-many relationship. The information about which person is in which group is stored as a membership. This membership is also called the "Edge", the connection between the two other nodes.
This could look something like this in the schema.graphql file of your module:
type Community_Group implements Node {
  id: ID!
  name: String!

  # We want to be able to query for a list of persons that are members in that group
  members: [Community_Person!]! @relation(
    path: "Community_Group=group.Community_Membership.person=Community_Person"
  )
}

type Community_Person implements Node {
  id: ID!
  name: String!
}

type Community_Membership implements Node {
  id: ID!
  person: Community_Person!
  group: Community_Group!

  # You can add any number of fields here, to customize the edge. Those values will also be
  # available when querying the edge. You could for example add "createdAt" or "status" etc.
  # This can also be used for filtering the connection
}
If you look at the argument path of the @relation directive on the field members, you can see
how the connection is formed for an Many-to-many relation:
<SourceNode>=<SourceNodeFieldOnEdge>.<Edge>.<TargetNodeFieldOnEdge>=<TargetNode>
This is the equivalent of how you would build a join in a traditional SQL database.
- The path is a string that always starts with the typename on which the virtual relation field is added.
In this case the field
membersis added onCommunity_Group. -
The next part after the first
=defines the edge that connects the two nodes. In this example this is the edge type surrounded by the two fields that contain the values for the nodes on both sides:group.Community_Membership.person. On the left side of the edge we have thegroupvalue that should be equal to theCommunity_Group, and on the right side we have thepersonvalue that should be equal to theCommunity_Person. -
The path always ends with the typename of the virtual relation field, in our case
Community_Person
One-to-many Relation
Creating a virtual One-to-many relation between two nodes is very similar to creating Many-to-many relations.
You can use the @relation directive and specify the path to the target node.
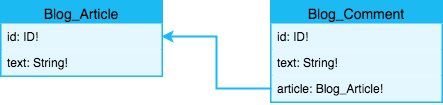
Let's assume you want to build a simple blog module with comments. One blog article can have multiple
comments, and we want to have a field comments on our article type that returns all the comments
for that specific article.
Example schema.graphql for the blog module:
type Blog_Article implements Node {
  id: ID!
  text: String!

  comments: [Blog_Comment!]! @relation(path: "Blog_Article=article.Blog_Comment")
}

type Blog_Comment implements Node {
  id: ID!
  text: String!
  article: Blog_Article!
}
One-to-many Relation via Edge
You can also create One-to-many relations via an edge type, similar to the Many-to-many relationship. This can be useful when you don't want to change any of the nodes that you want to connect or when you want to put the connection functionality in a separate module that does not alter the functionality of any of the existing nodes.
You can use type extensions to connect the nodes and create the edge type separately.
Let's assume we already have a support ticket module in our project. We also have a machine inventory module that stores all the machines that a company owns. Now we want to be able to assign a support ticket to one machine and then get a list of all tickets for a specific machine without changing any of the existing modules.
The inventory ticket schema.graphql could look something like this:
type InventoryTicket_Assignment extends Node {
  id: ID!
  machine: Inventory_Machine!
  ticket: Support_Ticket! @unique
}

extend type Inventory_Machine {
  InventoryTicket_tickets: [Support_Ticket!]! @relation(
    path: "Inventory_Machine=machine.InventoryTicket_Assignment.ticket=Support_Ticket"
  )
}
There are two things important here:
- The
@uniquedirective on theticketfield of our edge ensures that every ticket can only be assigned to one machine. This gives us a One-to-many relation. Without the@uniquedirective this would give us an Many-to-many relation. - The field name of the extension on the type
Inventory_Machinehas to start with the namespace of the app because we are extending a type that is not part of the same module. Also see type extensions for more information. If all the definitions of all the types would be within one module, you would have to omit the namespace prefix in the field name.
One-to-one Relation via Edge
You can also create virtual One-to-one relations between types without changing the connected nodes.
This looks identical to the One-to-many Relation via Edge. The only difference would be that both
fields on the connecting edge have the @unique directive.
If we take the previous example but want to ensure that every ticket can only be assigned to one machine and that every machine can only have one ticket, the schema would look something like this:
type InventoryTicket_Assignment extends Node {
  id: ID!
  machine: Inventory_Machine! @unique
  ticket: Support_Ticket! @unique
}

extend type Inventory_Machine {
  InventoryTicket_tickets: [Support_Ticket!]! @relation(
    path: "Inventory_Machine=machine.InventoryTicket_Assignment.ticket=Support_Ticket"
  )
}